
Các công cụ cần download trước khi cài đặt:
- Notepad++
- PHP download
- C++ 2015
- C++ 2012
- URL Rewrite Module
- PHP Manager
- MariaDB/MySQL
- Snipe-it
- Composer
Kính hoạt tính năng Web Server
- Mở Server Manager -> Dashboard -> Add roles and features
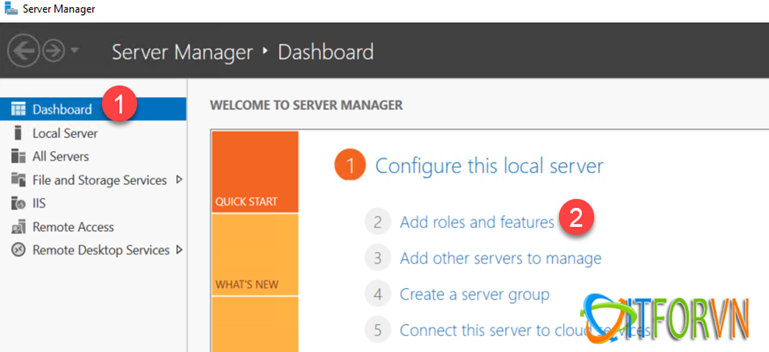
- Nhấn Next

- Chọn Role-based or feature-based installation. Nhấn Next
- Chọn Select a server from the server pool, chọn tên server bạn muốn cài đặt. Nhấn Next
- Chọn Web Server -> Add Feauter. Nhấn Next
- Nhấn Next, Chọn Application Development -> Chọn CGI. Nhấn Next
- Chọn Restart the destination server automatically if required. Nhấn Install
- Thành công
- Để tắt bảo mật trình duyệt web, Vào Server Manager -> Local Server -> IE Enhanced Security Configuration, nhấn vào On, Tick vào 2 dòng Off. Nhấn OK
- Truy cập link: http://localhost/, nếu hiện ra giao diện web, bạn đã bật thành công Web Server
Cài đặt Notepab++
- Mở danh sách phần mềm dowload ban đầu, cài đặt notepad++
Cài đặt PHP
- Copy thư mục “php-7.4.7-nts-Win32-vc15-x64” đã Dowload, phần mềm dowload số 2. Dán vào ổ đĩa C. Đổi tên thư mục thành PHP
Cài đặt Visual C++2015
Cài đặt Visual C++2012
Cài đặt URL Rewrite
Cài đặt PHP Manager
- Vào Server Manager -> IIS -> Click phải vào tên Server của bạn -> Internet Information Services IIS Manager
- Click phải vào Icon dưới thanh Taskbar, chọn Pin to taskbar, để dễ thao tác về sau
- Chọn server, nhấn vào PHP Manager
- Tại mục PHP Manager -> Register new PHP version, tìm đến đường dẫn C://PHP, chọn file “php-cgi”, nhấn Open. Nhấn OK
- Kết quả
- Cũng trong PHP Manager -> PHP Extensions, nhấn Enable or disable an extension
- Enable các tính năng giống như hình dưới
- PHP Manager -> PHP Settings, nhấn Manage all settings
- Nhấn Add bên góc phải, đặt tên theo hình. Nhấn OK
- Truy cập đường dẫn: C:\inetpub\wwwroot
- Tạo 1 file notepad tên “phpinfo.php” với nội dung “<?php phpinfo(); ?>”, bạn có thể tạo trên Desktop và copy dán file vào đường dẫn trên
- Mở Internet Information Services (IIS) Manager đã Pin dưới Taskbard. Nhấn Restart bên góc phải
- Truy cập Link: http://localhost/phpinfo.php, hiện ra giao diện web như hình
Cài đặt MariaDB
- Tạo password cho user root. Tick chọn Enable access from remote machines. Nhấn Next
- Chọn hết. Nhấn Next.
- Next tiếp, Install
Cấu hình MySQL Database và User
- Trên Desktop, mở phần mềm tên “HeidiSQL”
- Nhấn New , nhập Password vừa tạo ở bước trên. Nhấn Open
- Click phải vào khoảng trống bên trái, Create New -> Database
- Đặt tên cho database. Collation chọn: utf8mb4_unicode_ci. Nhấn OK
- Chọn database Snipeit, Tools -> User manager
- Nhấn Add, đặt tên User, password. Nhấn Add object, chọn snipeit. Nhấn OK
- Tick chọn tất cả. Nhấn Save
Cài đặt Snipe IT
- Copy phần mềm đã dowload tên “snipe-it-4.9.2” dán vào đường dẫn C:\inetpub\wwwroot. Đổi tên thư mục thành “snipe-it”
- Truy cập đường dẫn: C:\inetpub\wwwroot\snipe-it. Mở file “.env.example” bằng notepab. Save As file notepad rename thành “.env” có định dang đuôi .all lưu ở Desktop. Copy file .env dán lại vào C:\inetpub\wwwroot\snipe-it
- Mở file .env lên sửa nội dung: APP_URL: địa chỉ IP tĩnh của Windows Server. Cách chỉnh địa chỉ IP tĩnh bên dưới
- Điền tên, user name, password truy cập database, được tạo ở bước trên DB_DUMP_PATH: dán đường dẫn: C:\Program Files\MariaDB 10.1\bin
- Save file
Cách chỉnh địa chỉ IP tĩnh cho Windows Server
- Mở đường dẫn: Control Panel -> Network and Internet -> Network Connections
- Click phải Ethernet -> Properties
- Mở Ipv4
- Gán địa chỉ IP tĩnh -> OK -> OK
Cài đặt Composer
- Copy file “9. Composer-Setup” trong Folder dowload ban đầu dán vào đường dẫn: C:\inetpub\wwwroot\snipe-it
- Mở file “Composer-Setup” để cài đặt
- Tại thư mục trong đường dẫn: C:\inetpub\wwwroot\snipe-it. Nhấn File -> Open Windows PowerShell -> Open Windows PowerShell as administrator
- Chạy lệnh: ping 8.8.8.8 , để kiểm tra có kết nối Internet Chạy lệnh: composer install, chờ dowload tầm 5 phút Chạy lệnh: php artisan key:generate, nhấn Yes
- Copy Key trên dán vào C:\inetpub\wwwroot\snipe-it.env tại mục APP_KEY. Save lại
Tạo và mở Port truy cập website
- Mở Internet Information Server dưới Taskbard. Click phải Sites chọn Add Website
- Đặt tên, chọn đường dẫn C:\inetpub\wwwroot\snipe-it\public Gán Port tùy ý: ở đây mình để Port 3456.
- Nhấn OK
- Chọn Snipe IT -> Handler Mappings
- Php-7.4.7 -> Request Restrictions
- Nhập theo hình dưới, nhấn OK
- Truy cập: C:\inetpub\wwwroot\snipe-it\public. Click phải vào Folder Upload -> Properties -> Security -> Edit
- Gõ tên User Windows Server bạn đang dùng -> Check Names -> OK. Chọn User, Tick vào Full Controll.
- Nhấn OK
- Truy cập C:\inetpub\wwwroot\snipe-it\bootstrap, Click phải Folder “cache”. Phân quyền Full Controll tương tự như trên
- Truy cập: C:\inetpub\wwwroot\snipe-it, Click phải Folder “Storage”. Phân quyền Full Controll tương tự như trên
- Truy cập: C:\Windows, Click phải Folder “Temp”. Phân quyền Full Controll tương tự như trên
- Restart lại Web Server
- Truy cập http://localhost:3456 , điền các thông tin theo yêu cầu. Và bạn đã có thành quả.
- Để truy cập từ bên ngoài Windows Server. Bạn hãy NAT port trên Google Cloud Platform.
- Nat Port
- Sau đó truy cập: http://12.34.56.78:3456, trong đó 12.34.56.78 là IPWAN của Windows Server
- Cách lấy IPWAN: Trên giao diện Google Cloud Platform nhấn Menu -> VPC netword -> External IP addresses, copy địa chỉ External IP addresses dán vào ô Site URL bên trên.
Vậy là xong
Nguồn : ITForVn